
 This week we've been working on the Urban Corsage project, and thanks to Mark, I can post the directions for you. We made a few modifications, based on Meredith's taste (wristband -yes, flower - no) and materials we had on hand.
 First, we started with a collection of printed fabric, flannel, and vintage buttons.

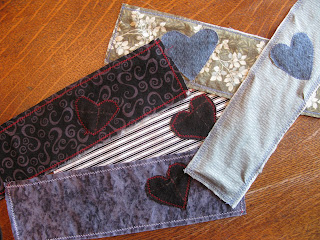
Next, we cut the fabric and the flannel to Mark's dimensions, and cut accent hearts out of the flannel.
I sewed the hearts on first, and then backed the fabric band with the flannel. I played around with the decorative stitches on my new sewing machine.

Then it was time to choose our embellishments. We veered from the directions a little. I knew I wanted to do a Velcro closure, so it would be easy for Meredith to put on/take off with one hand. But, I loved the look of the buttons on Mark's version. So, I used the buttons for my embellishment. You can also add ribbon, crystals, beads ... whatever you'd like.

The last step is to glue on the Velcro. For a project like this, it's important to use a strong glue with a flexible bond, like E-6000. You should always select your glue based on the requirements of your application. Since this was a wearable item, I knew I wanted a flexible bond. I can go on and on about glue ...
Here are my final samples:


Here's Meredith, good to go!

Click here to see Mark's Urban Corsage -- I really love his fabric, and honestly, I would have gone for the flowers, too.
Here are the directions for the Urban Corsage from The Big Ass Book of Crafts by Mark Montano:
Supplies:
2 pieces of 11″ x 3″ fabric (with edges that fray are the best)
Buttons
Rhinestones
Faux flowers & leaves
Ultrasuede
Amazing E-6000 Craft Adhesive
Different colors of thread
Sewing machine with zigzag stitch capabilities
2 pieces of 11″ x 3″ fabric (with edges that fray are the best)
Buttons
Rhinestones
Faux flowers & leaves
Ultrasuede
Amazing E-6000 Craft Adhesive
Different colors of thread
Sewing machine with zigzag stitch capabilities
Directions:
1. Place your fabric pieces on top of each other and zigzag stitch them all around, about 1/2 inch in from all four sides. One piece of fabric is the outside and the other is the inside. Kind of like a fat watchband with a button closure instead of a buckle.
2. Arrange your leaves and zig zag stitch them onto the cuff.
3. Take your faux flower apart and zig zag stitch it to the center.
4. Cut out hearts, stars, random shapes and zig zag stitch them around your flower.
5. Stitch three buttons to one side of your flower (for different wrist sizes)
6. Wrap the cuff around your wrist to figure out where the button holes should go and mark the placement. If your sewing machine has a button hole setting, stitch one in. If it doesn’t you can cut a slit and stitch the edges of the cut.
7. Using E-6000, add rhinestones to the center of the flower and the cuff.
Accessorize with your favorite jeans and t-shirt and show it off!
If you make one, send me a photo! And don't forget my glue give away -- you have until Monday to enter.


Cool! I like Meredith's -- kind of a more rockin' version -- but I also like Mark's -- really conveys the idea of a corsage. It seems even easy enough for a non-crafter like me!
ReplyDelete