Showing posts with label craft project. Show all posts

Monday, October 6, 2014

Craft-tastic

I am pretty particular about my DIY projects. Is it clever? Would I use it? There is just too much clutter out there, and not enough originality. Last week I came across a really great project: this
 "accoutrement" from P.S. I Made This. Part jewelry, part accessory, all genius.


Monday, February 7, 2011

Be My Valentine

Here is a quick and easy Valentine's Day card project for you. Remember when I made the cute felted sweater pillow? I wasn't sure what to do with the scraps, so I just cut them into random heart shapes. A few days later, I had this idea. If you don't have a felted sweater handy, just use felt from the fabric store.


Sew simple!

Friday, January 21, 2011

Snow Day Project

When my kids were in preschool and I was a stay-at-home mom, I loved to wear colorful, seasonal sweaters. Now that they are teens and I'm working for a living, not so much. Here's a fun way to upcycle your old wool sweaters (this would work with blankets or throws as well):

Step 1: Forget all the rules of laundry, and throw your sweater in the washer set to hot water. Add detergent and a few towels and/or a pair of jeans.

Step 2: As the washer agitates, the wool will begin to shrink and felt. When the cycle is done, check to see if you're happy with the progress. My sweater felted a little, but I could still see the stitches. I liked the look, so I tossed it in the dryer. Here's how it came out:

 Step 3: Cut the sweater as if it's fabric in a shape to fit a pillow form. I used one side seam as an edge. Turn right sides together, and sew the open sides, leaving a small gap to insert the pillow form.

Step 4: Turn the pillow case right sides out and insert the pillow. Hand sew the gap closed. You'll find the wool "swallows" up your stitches, so using a doubled thread is fine and you'll hardly see the hand stitching.

Tah-da! My new seasonal accent pillow:

Friday, April 2, 2010

A room with a view

There have been many variations on the "old window as wall art" projects, but I just love the version I came up with.

All you need is an old window, a high-resolution photo, some foamcore, a staple gun, two eye screws, and chain.

First, I washed the window. Believe me, it was dirty. It had been sitting in our garage for ages. It's one of the only "old" things that was left in this house, so I had to do something with it.


After the bath, I let it dry for a few days. I wanted to be sure all the moisture was out of the wood. Meanwhile, I picked a favorite photo (I took this one last summer of the neighbor cows when DJ and I were on our morning walk). I ordered a poster-sized enlargement from Wallgreens.com.


I glued the poster to a piece of foamcore, and stapled the entire thing to the back of the window. Steve helped me with the eye screws and chain, and here's the result:


Friday, March 12, 2010

Easy Peasy Kid Pleaser

Do you have little ones at home? Next time you make cookies, try this idea:


Bake your cookies on a stick. It makes them so much more interesting and fun to eat, especially on a spring day (I'm assuming spring has arrived somewhere in the country!). That's three-year-old Karin between her two friends Scott and Laura back in 1966. Weren't our moms clever?

Thursday, February 25, 2010

Ornaments

Back in December, I had this great idea to make ornaments and use them as present toppers. I had so much fun with my felted Snowpeople, that I wanted to keep going. Well ... the one thing I did not have in December was a lot of time to sit around and do lapwork! My felted balls were put aside for another time.

Now that the Olympics are on, it's the perfect job. It doesn't require a lot of light or concentration, and it keeps me busy during all those heats!

Start with some wool roving and a felted bead. You can make your own felted beads (there are directions in Altered You!) but I've been buying mine from Art Girlz. Use a needle felting needle to work the roving into the surface of the bead. There is no right or wrong way to do this, and you can make up your pattern as you go -- my kind of craft!


I used the felted beads to make these ornaments. I strung them on craft wire, made swirls and loops, and layered them with sequins and some gaudy Czech glass beads leftover from an assortment I bought:


Here's a close up of the bead:


So if you know me, don't be surprised if you see one of these next December (if I remember I made them, that is!).

Saturday, February 20, 2010

Project Update

A few posts ago, I laid out all the projects I wanted to complete during my winter couch-potato TV watching time. I've made some progress. I started out during the superbowl with these darling boxes.


They were easy to cut and fold (especially because my basket of Christmas Cards was still on the coffee table!). It was fun to re-read all the Christmas messages in a less-hurried time, and then I had no regrets when I upcycled the beautiful cards. I only completed one into the box, and the rest will store flat until next year. I stashed them in my box of Christmas wrapping paper (along with the folding directions) so I won't forget about them. You can find directions to make your own, here. Come to think of it, I've got some Valentine's Day cards out now...


I showed you my foray into bead stitching, with Amy's darling ring. I'm working on some earrings now, but I need a little more concentration (and light) than I get in front of the TV. Hopefully I'll have something to show on Monday.


I've also started the jewelry reconstruction. Sometimes when I'm wearing a piece, I realize it's a little "off," so I've been tweaking here and there and feel like I've got some brand new pieces for very little effort.


So, what have you been making?

Monday, February 15, 2010

Super Easy Hostess Gift


We were invited to our friends' house for a casual and impromptu dinner last night, and we were just bringing wine. Being Valentine's Day and all, a bottle of wine didn't seem like enough, though, so I decided to dress it up a bit. My first try was wire -- nice, but not polished enough. And then I landed on this great wine-bottle lariat idea. Love it. How cute would it be to customize this idea for a shower, or for party favors?
Supplies:
5" chain
loop end of toggle clasp or large jump ring
3-4 charms
2 4-6 mm crystal beads
2 headpins
jump rings as needed
1. Attach the toggle loop or large jump ring to one end of the chain.
2. Attach a charm to the other end.
3. Attach the remaining charms on each side of the chain near the end with the charm.
4. String a crystal on a headpin and make the first half of a wrapped loop. Connect to the chain and finish the wraps. Repeat with the remaining crystal and headpin.
5. Wrap the chain around the neck of the wine bottle and drop the end through the loop.

Wednesday, December 30, 2009

Oh, snap.

Sorry. Couldn't resist. Look at what Cyndi did with the snap project from Altered You! Quite an elegant take on a simple project. I think I'm going to scrounge around my work table and make some more of these! Love her blog, too -- "emptying landfills one project at a time! How great is that?

Thursday, November 12, 2009

Easy Scarf Project

Although a scarf is about the easiest thing to knit, I have two no-knit scarf projects to share with you. The first one is really fun if you're a color-outside-of-the-lines crafter. The second is just as easy, but a little more measuring is involved.

No-knit yarn scarf:
I have been wearing this scarf for about four years, so it looks a little raggedy, but I still love it.


In fact, I love it so much, I made a second one to go with a different coat.


What I like the most about this project is you have so much control over the colors, the length, and the width. I wanted a scarf that would wind around my neck several times and then have the perfect length ends to tuck into my coat without being too bulky.

To make the scarf, gather miscellaneous yarns in complementary colors. I chose several weights and textures. You'll also need a product called Solvey (it's like a roll of plastic wrap but it dissolves in water). Finally, you'll need thread and a sewing machine.

1. Determine your finished length. I did this by draping a strand of yarn around and around and then measuring it.

2. Cut a piece of Solvey equal to your desired length and place it on a work surface (a kitchen island or long dining room table is great).

3. Cut and arrange your fibers along the length of the Solvey. You want them fairly close together.

4. If you want to make little flourishes like this one, just wind some yarn around your finger and pin it in place with two pins crossed like an X.
5. When you're happy with the way your scarf looks, layer a second piece of Solvey on top of the yarn. Pin through all the layers, creating a "sandwich."

6. With contrasting or matching thread, sew a straight line across the width of the scarf about 6 inches from the end. Repeat on the other end.

7. Randomly sew between the two "anchor" seams until most of the fibers are secured. Have fun making zig-zags and curves with your thread. About every four inches, make sure you sew completely across the width of the fibers. To secure the flourishes, sew across the bundle at least once -- you want to secure it but give it room to spring up. As you sew, your packet will become more compressed.

8. Soak the bundle in water to dissolve the Solvey. If your fibers are wool, handle carefully to avoid felting. Rinse until the Solvey is completely dissolved.

9. Dry over your shower curtain rod. Blot with a bath towel to speed the drying process.

10. On each end, tie the loose strands together to create fringe. Enjoy!
Flannel-lined fabric scarf
You'll need about 1 yard of flannel and about a half-yard of several fabrics. I used a similar scientific method to measure my desired length: I draped myself with yarn, measured the length, and then rounded the number to make the math easier. My length is about 80 inches and my width is about 9.
1. Cut a piece of flannel to your desired length and width, or sew together a few pieces to create the length you want. Mine has a seam in the middle.
2. Decide what you'd like to do with the accent fabric. I decided I wanted about a foot of accent color on each end. You can add three or four accents if you'd like. Cut your fabric and sew together until you have a rectangle the same size as the flannel piece. Iron your seams flat.
3. With wrong sides together, pin the fabric to the flannel. Beginning at the 1/3 mark of a short end, sew toward the long edge. Turn the corner and continue sewing the scarf together until you are back to the short edge where you began. Turn the corner, and sew about 1/3 of the way across. Secure the thread by backstitching a few times.
4. Trim all the edges and clip the corners.
5. Turn the scarf right-side out, using the hole at the bottom. Press the scarf.
6. Close the seam by either hand stitching together or fusing with fusible webbing.
Voila!

Saturday, August 22, 2009

Support the ArtGirlz

I've been a huge ArtGirlz fan since I first came across them years ago at CHA. I highly recommend their kits -- you'll have everything you need to make a really fun project in just a few hours. They're having a giant sale on their site. I also love their papers, scrapbook supplies, and blank journals. I used their felt beads in the memory bracelet project in Altered You! Just like all of us, they're having a tough time this year. So if you're in the mood to craft a little, or if you need to make a quick gift for someone, or if you've got a crafty friend who needs more stuff for her stash, stop by their site and take advantage of the great deals.

Wednesday, April 22, 2009

Just say no to plastic

Happy earth day!
Do you use re-usable grocery bags? Do you always remember to bring them into the store with you? My 2009 earth day goal is to not only have them in the car with me at all times, but to actually bring them into the store each time I shop. I’m getting better, but I’m not there yet.


Here’s a project to jazz up your bags, so you’ll never forget them.

Materials:
Printed fabric (choose from pre-cut fat quarters)
Fusible webbing material such as Steam-A-Seam
Fabric glue (optional)
Grocery tote
Scissors
Iron and ironing board

Fuse the webbing to the back of the printed fabric.
Cut out pattern around the pattern, leaving a straight edge on the bottom and side.
If your bag is canvas or cloth: iron the cut fabric to the bag, matching the straight edges to the bottom and sides, or really however you’d like.
If your bag is made from recycled plastic, as mine is, the iron will melt the bag (trust me, even on low). Either use a pressing cloth and very carefully press the fabric to the bag, or use fabric glue.

Here’s a close up of my tote:

Friday, April 17, 2009

Easy sewing project

Do you ever encounter climate-control disagreements with your traveling companion? My theory is that the driver (usually my husband) needs to be perfectly comfortable which leaves me about 10 degrees cooler than I'd like. The same goes for the hotel room -- the driver controls the AC to guarantee a good night's sleep, which means I'm a little chilly on my side. Here's my solution: An easy-to-make lightweight travel blanket that works in the car but is big enough to provide an extra layer overnight.

Start with three Pashmina-style scarves (check clearance racks for great bargains this time of year). All you need to do is to sew them together, and you'll have an easy-to-pack, warm blanket.
I found out the hard way that sewing these thin, long, scarves together is a little easier said than done, especially if you are just a craft sewer like I am. I had trouble keeping the edges lined up, even with a lot of pinning. And, much to my dismay, I found out that the scarves were not equal lengths to start with, so I got a ragged edge.
To help with the sewing, I used some fusible webbing material to fuse the scarves together before sewing:
This really helped with the alignment. Then I top stitched along the same path in a contrasting color just for fun. If I had really planned ahead, I would have staggered the scarves so the un-evenness would be equal on each end.
So, what do you think?

Sunday, February 22, 2009

I heart Mondays

Here's a simple little project for you, made of hearts. It's a great embellishment for cards. All you need is a heart-shaped punch and two shades of paper. If you don't have punch, you can trace a pattern on cardboard. I use my heart-shaped cookie cutters for crafts more than cookies!


Punch four hearts in one color and four in a second color. Attach the first color at the points with the edges overlapping slightly. Repeat with the second color. Glue the two circles together so the curved edges are slightly out of alignment. To finish, use a mini punch to make a four-heart center, and top with a rhinestone. Voila.

Friday, February 13, 2009

Big A** Busy

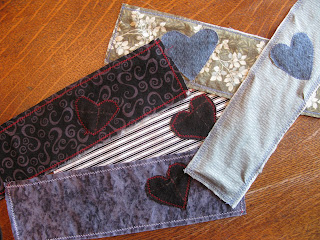
A while back I wrote a mini review of the Big Ass Book of Crafts by Mark Montano. Well, this is what our copy of his book looks like, after Meredith flagged all the projects she'd like to make! This week we've been working on the Urban Corsage project, and thanks to Mark, I can post the directions for you. We made a few modifications, based on Meredith's taste (wristband -yes, flower - no) and materials we had on hand.


First, we started with a collection of printed fabric, flannel, and vintage buttons.

Next, we cut the fabric and the flannel to Mark's dimensions, and cut accent hearts out of the flannel.
I sewed the hearts on first, and then backed the fabric band with the flannel. I played around with the decorative stitches on my new sewing machine.


Then it was time to choose our embellishments. We veered from the directions a little. I knew I wanted to do a Velcro closure, so it would be easy for Meredith to put on/take off with one hand. But, I loved the look of the buttons on Mark's version. So, I used the buttons for my embellishment. You can also add ribbon, crystals, beads ... whatever you'd like.

The last step is to glue on the Velcro. For a project like this, it's important to use a strong glue with a flexible bond, like E-6000. You should always select your glue based on the requirements of your application. Since this was a wearable item, I knew I wanted a flexible bond. I can go on and on about glue ...
Here are my final samples:


Here's Meredith, good to go!


Click here to see Mark's Urban Corsage -- I really love his fabric, and honestly, I would have gone for the flowers, too.
Here are the directions for the Urban Corsage from The Big Ass Book of Crafts by Mark Montano:
Supplies:
2 pieces of 11″ x 3″ fabric (with edges that fray are the best)
Buttons
Rhinestones
Faux flowers & leaves
Ultrasuede
Amazing E-6000 Craft Adhesive
Different colors of thread
Sewing machine with zigzag stitch capabilities

Directions:
1. Place your fabric pieces on top of each other and zigzag stitch them all around, about 1/2 inch in from all four sides. One piece of fabric is the outside and the other is the inside. Kind of like a fat watchband with a button closure instead of a buckle.
2. Arrange your leaves and zig zag stitch them onto the cuff.
3. Take your faux flower apart and zig zag stitch it to the center.
4. Cut out hearts, stars, random shapes and zig zag stitch them around your flower.
5. Stitch three buttons to one side of your flower (for different wrist sizes)
6. Wrap the cuff around your wrist to figure out where the button holes should go and mark the placement. If your sewing machine has a button hole setting, stitch one in. If it doesn’t you can cut a slit and stitch the edges of the cut.
7. Using E-6000, add rhinestones to the center of the flower and the cuff.

Accessorize with your favorite jeans and t-shirt and show it off!
If you make one, send me a photo! And don't forget my glue give away -- you have until Monday to enter.

Monday, February 2, 2009

I heart Mondays
A few years ago I was editing Knit & Crochet Combined at work, and of course I had to have a knitting project going on at home, too. I made a small blanket. I tend to get impatient with directions, though, so the next project I did I wanted to make up on my own. I "designed" a purse that I knit and then felted. For the embellishment, I wanted to practice increasing and decreasing, so I decided to knit this heart. When it was done, I felted it too and sewed it onto the purse. What I didn't realize is that the beauty of felted material is that it can be cut without unraveling. If you want to make something similar, just knit a square, felt it, and then cut out the heart shape for your embellishment.

Saturday, January 3, 2009

Favorite Christmas Project and a Book Review


First the review ... you really must check out Jennifer Perkin's book, The Naughty Secretary Club: The Working Girl's Guide to Handmade Jewelry. Check out the book, her blog, and her website -- everything about this girl is fun. What I adore about the book is although it might sound gimmicky, and the jewelry is all of a certain bold and statement-making style, the projects are extremely creative and well made. You won't go wrong making any of them, and you'll learn skills and tips that apply to any kind of jewelry making. In fact, her cover project (Shredded Junk Mail necklace and bangle) inspired my favorite Christmas craft project of 2008. I'll let you consult Jennifer's book for the directions, but here's my version (made from shredded Black Friday Sale circulars):


This was just part of my Green Christmas theme this year ... I'll show more bits and pieces over the next few days. Happy New Year!

Wednesday, December 3, 2008

Searching for your muse?

Creative Road block

Ten Tips for getting past your creative dead end


1. Pick a project from a magazine, or buy a kit, and make the project according to the directions as they are written – no short cuts. This will force you to think like another designer, and a slightly different approach to a project can teach you a few things.

2. Take a walk, ride your exercise bike, or even do a sink-load of dishes by hand. The repetitive motion of the mindless task will let your mind wander, and you may just stumble onto your path out of your road block.

3. Try a small project in a new hobby – if you bead, sew something. If you paint, try polymer clay. Working in a similar, but new-to-you medium may help you look at the same-old-same-old (color blending, for example) in a new way.

4. Make a gift: choose colors for your friend, not for you. Think of your friend as you work. Consider her colors, her size, her preferences. Your gift will come from the heart, and you may find that thinking away from your own style will re-open your creativity.

5. Accept a commission. Kind of like #4, making something to someone else’s specifications will make you consider new materials, new combinations, new approaches.

6. Look through pictures of your old work (you do take pictures of your masterpieces before you release them, don’t you??). When I’m on a jewelry-making roll, something kind of takes over, and I make things I really had no prior plans for. Call it my muse. When I look back at old work, sometimes I think, “Wow. That was really good, and I hardly remember making it.”

7. Get thee to a city. For me, it’s Milwaukee’s Third Ward, or preferably, Chicago. I love my country life, but more than a few times a year I need to see the crowds, check out what people are really wearing, see what’s in the stores. I’m instantly refreshed, and ready to get going.

8. If you’re a city-dweller, come on out to the country. The rolling landscape, even in winter, can be quite inspiring. I see more than seven shades of brown (an a whole lotta white) outside my window right now.

9. If you can’t get to the city or the country, go ahead and watch some TV. Now, I’m not a big fan of TV, and I went several years without seeing an episode of everyone’s favorite Sunday-night drama. However, when I finally turned it on, I smacked my forehead. What a great source for fashion and jewelry inspiration! The same can be said for lots of sitcoms and even the nightly news.


10. Just do it. Jump in, get going, bite off more than you can chew. You’ll never get anywhere if you don’t get started. Even if you have to un-do everything you’ve done, doing something is much better than doing nothing.

Tuesday, November 18, 2008

Snowflakes inside and out

Well, I guess it's finally winter.


We've got snow outside, but just little flurries.


I've been busy beading snowflakes -- one for a special request, and then I just couldn't stop myself. Here are a few tips, if you want to make your own.
Buy the snowflake forms at a craft or beading store. They should be soldered together, but I heard from a customer who kept her snowflake out year-round that it ultimately came apart. This year I wired the middle together with very fine (26 gauge) wire before I added the beads.
Use very nice Czech glass beads or crystals. You don't have to go all-out for Swarovski (although I have before and they are really beautiful). Using nicer glass and crystals will make your ornament sparkle in the sunlight and give it life beyond the month of December.
The bead forms are made from very stiff wire. It's very difficult to turn the ends into perfect loops. Let gravity work on your side, not against you. Pick the top of your ornament. As you bead, turn all your loops up, so the small gap where the wires meet is toward the top. Then, if you choose to add dangles to the loops, gravity will help them stay in place.
Remember, don't use jewelry-grade cutters to trim the wires. You shouldn't have to trim at all, but if you do, make sure you have heavy-duty wire cutters.
This is a great activity to do with friends or kids, and it's a great way to use up your stray beads. Have fun and stay warm!

Thursday, October 30, 2008

Which Witch?

The Art Girlz witch! Sometimes when you want a quick project, or you want to try something outside of your normal skill set, the best bet is to get a kit. I fell in love with this witch and just had to make her. In fact, I love everything on their site (and their blog is fun, too.) I used their felt beads in several Altered You! projects, and we've made vacation scrapbooks with their blank books.


Happy Halloween!